FIRST AND FORMOST I WOULD LIKE TO THANK LoneWolf24k WHOM I BLATENTLY RIPPED OFF BY COPYING THE FIRST PART OF THIS GUIDE FROM HIS POST, HE HAD DONE SUCH A FANTASTIC JOB ON THE STARTING WAYPOINTS FOR THE MISSIONS AND GATHERING OTHER INFORMATION, I SAW NO POINT IN DGOING BACK AND REWRITING IT MYSELF, THE GUIDES THEMSELVES HOWEVER ARE MY HANDYWORK, I HOPE THIS HELPS EVERYONE OUT THERE.


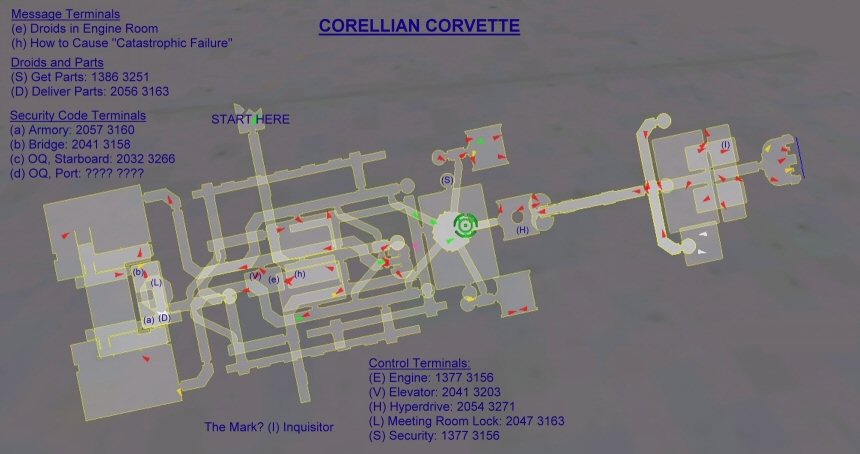
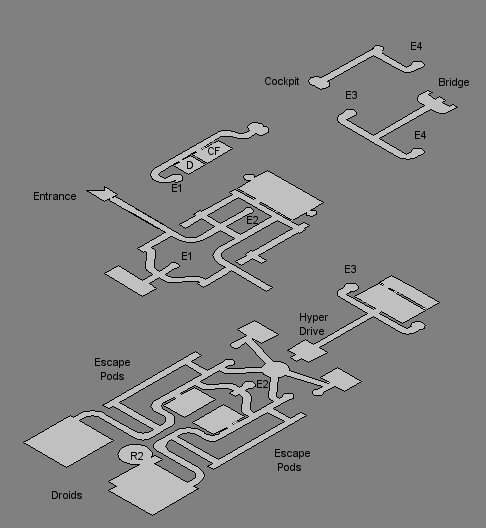
Be sure to look at the links page at the bottom of this post for more additional information. Under links I will have a MAPS part setup as well.


IMPORTANT: LOT OF PEOPLE HAVE ASKED
Q: HOW MANY PEOPLE CAN YOU TAKE?
A: A GROUP OF 10 IS THE MAX YOU CAN TAKE IN THE CORVETTE


To get the ticket you need to do the following:
1) Talk to the initiator at the locs below.
2) They will give you three places to look to get the evidence they need
- Note: Technically, you only need to do one of the 3 options the initiator gives you to get the ticket. But it has to be the -right- one. You can do one of them and get a wrong item, come back and get some faction and be told to go off and check the other two spots.
3) Go to the appropriate Shuttleport and have the ticket holder use his ticket. At that point the rest of the group is asked if they want to go. Click yes if you want to go.


Imperial:
Destroy Mission:

Lt. Velso: Emperor's retreat, Naboo (2405, -3967)
1st - The codes in anchorhead (134, -5349) are found in a container next to the reb recruiter in the cantina.

2nd - Dantooine - The Dantooine Location is the Janta Stronghold (7197, -4090). Find the drum near the bottom of the cave. It is in the only item that isn\'t a mag-seal container. it is also next to a mag-seal container

3rd - Erran Sif (2143, -5649) on Talus one level on a table \"I had to search, it was directly in front of me as I came into the second room\"


Assassination mission:

Lt Sabol: Tatooine, Bestine (-1291 -3539)
1st - Afarah Cave (Corellia) located in the cave outside of Kor Vela (-2557 3005) - **it is located if your at the chair, turn facing away and walk into containers..one of the black one will have a search option on it.

2nd - Abandoned Rebel Base (Dantooine) (-6676 5557) - **as you go in the gate the building on your right just inside has it in a black container that has search option in radial.

3rd - Dathomir (5696 1952) - Document is located at crashed space craft NE of outpost.


Rescue mission:

Colonel Darkstone: Tatooine, Imperial Oasis (-5321 2702)
1st - Droid Engineer Cave: South face of volcano on Lok, POI. When you enter type /target storage and the container will be selected; and yes it\'s at the VERY bottom of the cave (/boggle). Take the left branch. Bring armor, pixie, and vercupti or buffs and/or friends. It\'s not too hard to get down there. Just burst past all the droidekas and keep the storage container selected. Search it and run.

2nd - Rogue Corsec Base: Corellia, (5200 1600) (i think). Its in the smaller multilevel building again at the very bottom. Type /target storage to select.

3rd - Woolamander Palace: Yavin, POI. Once inside go right and sneak past woolamanders in the entrance chamber. You\'re looking for a small container; its along the right wall as you walk in near the harrowers (which deathblow FYI).


Neutral: (Jabba)

Destroy Mission:

Bruce McBrain: Jabba\'s Palace, Tatooine Entrance area (-580 –6220)
1st - Maulers ?Stronghold? on Naboo(POI)

2nd - Rogue CorSec(POI)

3rd - Dath Nightsister Slave Camp(POI) - You don\'t have to go all the way down. When you enter the cave, in the first large open area if you look at the overhead map (Ctrl+M) you will see a small cove on one side. There is a decayed/destroyed container there, do a search on it. You don\'t have to go down and kill the protector or the elder (though that was fun!).


Assassination mission:

Bronell: Jabba\'s Palace, Tatooine 2nd Floor by Ephont Mon (-5914 -6232)

1st - Binayre Pirates on Talus (POI)

2nd - Naboo, Pirate Bunker (-1507 -1729)
3rd - Canyon Corsairs on Lok


Rescue mission:
Yondalla: Wayfar, Tatooine Inside cantina (-5150 -6588)

1st - Kahmurra Bio-Genitics Lab (POI) on Talus - In Rusty Container (near the bottom)

2nd - Lord Nyax Hideout (POI)on Corellia - In Bookcase before you get to Lord Nyax\'s room
3rd - Korgas on Endor - This is actually the Korga cave POI, document was in a rusty container. Turn right at the split, and it is all the way in the back.


Rebel:

Destroy Mission:

Master Sergeant Crowley: Corellia, Kor Vella (-3404 3092)

1st - Lok Imp base (-1891 -3032) (iin fenced in area)

2nd - Dath Prison camp - By desk where the prisioner is behind bars(back left side of base)

3rd - Roi Corbal cave 2nd level down In bookshelf


Assassination mission:

Pashna Starkiller: Corellia, Bela Vistal (6772 -5697)
1st - Geonosian Cave

2nd - Fort Tusken (Go in through the cave, in the second room, a small crate on the floor)

3rd - Mokk Village (-7065 -3326) in a damaged metal drum.


Rescue mission:
Adar Tallon: Corellia, Tyrena (-5448 -2674)

1st - At the warren on Dantooine - The table in the first big room. (-526 -3870)

2nd - At the crash site on Lok - A crate in a small room (3658 2185).

3rd - At the imperial prison on Dathomir - The storage crate in the cell buildings. The container is at (-6352 749).


Links Section:


This link is so far 90% of where i\'m getting this information from - Use this link if you have questions about certain parts of the Corvette missions. Many people have posted lots of good information to help anyone.
Coriellian Corvette FAQ: Let\'s keep the info together

With the combined infomation of many people on many sites i\'ve came across another place with good info.

The Order: Forums post by Daeyron.


Maps Section:


END LoneWolf24k\'s Section, thx for this half of the guide man


NOW FOR THE WALKTHROUGHS

THE CORVETTE DESTROY MISSION


Basically there are 6 things to do in order to complete this quest: Get the codes, Unlock the Elevator, Set the Fuel, Set the Hyper Drive, Set the Engines, Use the Escape Pod

1.) Get the Codes


the only required code for this particular mission is The Bridge Code, it is obtained by....

from the begining of the ship, make the first right, take it to the juncture, make a left to the elevator, take it up, make the first right, open the chest in this room to get OPERATIONS DISK #4.

Take the elevator back down, go straight across into the \"computer room\" turn right, in the far left corner is a computer, use the disk to restart it, then use the computer again to obtain the Bridge Code


2.) Unlock the elevator


this can be a little \"tricky\" and time consuming, but not if you know this highly regarded and very little known trick...(even a lot of the \"Vette Masters\" I\'ve seen on these forums don\'t know this one hehe)

from the begining...go straight.....take the elevator going down....make a right off the elevator, take the first right, then a left into the hallway....here to the left you will see a door with a keypad on it....this is the room that has the elevator unlocking terminal

Now here\'s the trick: 90% of the time you can look into the room, but if you try to go into it, you will be pushed out and often killed.....so moving very carefully, position yourself in the doorway at an angle facing the terminal....be sure not to go too far in as it will throw you out and may result in death or incap...when you are at a good enough angle click the terminal and Voila....the elevator is unlocked....about 10 mins saved right there..

Barring that trick there are 2 other ways to go about it, the first is the \"real\" or \"correct\" way to do it

what you are supposed to do is:

find the defunct droid, retrieve a part from it, goto the SBD room on the right side of the ship, take the stairs down in this room...go into the next room, fix the droid, he will turn off the electricity, and then get the code to unlock the Elevator terminal room, I don\'t have directions for this, as I NEVER use this method :p


the other way is a variation of this, instead of getting the droid part, go directly to the SBD room, down the stairs, and into the next room, look at the 2 droids googly eyed as you run through the electricity, and try to hit the terminal to get the code before you are incapped or killed by the currents coursing through your burned, scorched flesh...good luck with this method.....if you are succesful on your first attempt at this though....it does shave about 5mins off your time


3.) Set the Fuel


The Fuel Terminal needs to be set to the HIGHEST setting.....when it is clicked a popup will come up with 3 numbers at the bottom,
something like 40 60 80 no matter what numbers come up, always choose the HIGHEST one

the Fuel Terminal is located at: from the begining...go straight.....take the elevator going down....make a right off the elevator, take the first right, then a left into the hallway....take this straight into the SBD room....take the stairway there up, cross the platform and go into the room there....the Fuel Terminal is located at the back of this room


4.) Set the Hyper Drive


The Hyper Drive needs to be set to the LOWEST setting.....you will see a simiar popup to the one for the Fuel....except this time choose the LOWEST number

the Hyper Drive is located at: from the begining...go straight.....take the elevator going down....make a right off the elevator, take the first right, turn right, and take the tunnel going toward the front of the ship....this leads to a circular room with 5 halls leading off it... take the hall leading straight up....the Hyper Drive is located in this room to the right


5.) Set the Engines


The Engines need to be set to the LOWEST setting.....you will see a simiar popup to the one for the Fuel....except this time choose the LOWEST number

the Engine is located at: from the begining...go straight.....take the elevator going down....make a right off the elevator, take the first right, turn right, and take the tunnel going toward the front of the ship....this leads to a circular room with 5 halls leading off it... take the hall leading straight up....into the Hyper Drive room.....continue straight forward down the long hallway, at the juncture make a left....

this is the elevator you unlocked earlier, take it up.. off the elevator go left, and make the first left....there is another hallway here with doors that have keypads on either side, and a door at the end

go to the door at the end, use the keypad here, input the Bridge Code you aquired at the beggining, inside the next room on the left is the Engines Control


MISSION COMPLETE


Exit the ship fast to get the badge and reward

6.) Use the Escape Pod


simply use the first escape pod you come across to exit the ship, they are the big yellow buttons found at the ends of the long dark corridors located along the edges of the ship

if you are unsure of where to find one......from the begining, make the first left, go straight into the dark corridor, make a left, hit the big yellow buttom


You have now beaten the Corellian Corvette

Return to whoever gave you the mission to get your reward


My fastest time completing the mission and looting all items it 12 minutes, verified by the 8 people that went along with me and kicked back in the clone room while I ran the mission

Also as a side note: I wrote all this from memory so if there are any descrepencies I am sorry

I hope you find this helpful


THE CORVETTE ASSASSINATION MISSION


A word of advise.....take plenty of Commando\'s with you on this mission
Basically there are 4 things to do in order to complete this quest: Get the Portside code, Unlock the Elevator, Kill the General, Use the Escape Pod

1.) Get the Portside Code


the only code required for this mission is The Portside Code, it is obtained by....
from the begining...go straight.....take the elevator going down....make a right off the elevator, take the first right, turn right, and take the tunnel going toward the front of the ship....this leads to a circular room with 5 halls leading off it... take the upper left most hall, make a right, enter the room and use the computer located here


2.) Unlock the elevator


this can be a little \"tricky\" and time consuming, but not if you know this highly regarded and very little known trick...(even a lot of the \"Vette Masters\" I\'ve seen on these forums don\'t know this one hehe)

from the begining...go straight.....take the elevator going down....make a right off the elevator, take the first right, then a left into the hallway....here to the left you will see a door with a keypad on it....this is the room that has the elevator unlocking terminal

Now here\'s the trick: 90% of the time you can look into the room, but if you try to go into it, you will be pushed out and often killed.....so moving very carefully, position yourself in the doorway at an angle facing the terminal....be sure not to go too far in as it will throw you out and may result in death or incap...when you are at a good enough angle click the terminal and Voila....the elevator is unlocked....about 10 mins saved right there..

Barring that trick there are 2 other ways to go about it, the first is the \"real\" or \"correct\" way to do it

what you are supposed to do is:

find the defunct droid, retrieve a part from it, goto the SBD room on the right side of the ship, take the stairs down in this room...go into the next room, fix the droid, he will turn off the electricity, and then get the code to unlock the Elevator terminal room, I don\'t have directions for this, as I NEVER use this method :p


the other way is a variation of this, instead of getting the droid part, go directly to the SBD room, down the stairs, and into the next room, look at the 2 droids googly eyed as you run through the electricity, and try to hit the terminal to get the code before you are incapped or killed by the currents coursing through your burned, scorched flesh...good luck with this method.....if you are succesful on your first attempt at this though....it does shave about 5mins off your time


3.) Kill the General


The General in question here has a HAM of around 250k and 80% resists to everything except Heat and Blast

He is located at: from the begining...go straight.....take the elevator going down....make a right off the elevator, take the first right, turn right, and take the tunnel going toward the front of the ship....this leads to a circular room with 5 halls leading off it... take the hall leading straight up....into the Hyper Drive room.....continue straight forward down the long hallway, at the juncture make a left....

this is the elevator you unlocked earlier, take it up.. off the elevator go left, and make the first left....there is another hallway here with doors that have keypads on either side, and a door at the end

go to the first door on the left, use the keypad here, input the Portside Code you aquired at the beggining, inside the next room is the General, he usually has about 2-4 other people in the room with him, and he is EXTREMLY hard to kill.......

MISSION COMPLETE


Exit the ship fast to get the badge and reward

4.) Use the Escape Pod


simply use the first escape pod you come across to exit the ship, they are the big yellow buttons found at the ends of the long dark corridors located along the edges of the ship

if you are unsure of where to find one......from the begining, make the first left, go straight into the dark corridor, make a left, hit the big yellow buttom


You have now beaten the Corellian Corvette

Return to whoever gave you the mission to get your reward


Also as a side note: I wrote all this from memory so if there are any descrepencies I am sorry

I hope you find this helpful


THE CORVETTE RESCUE MISSION


Basically there are 4 things to do in order to complete this quest: Unlock the Elevator, Get the Prison Cell Code, Talk to the Prisoners, Use the Escape Pod

1.) Unlock the elevator


this can be a little \"tricky\" and time consuming, but not if you know this highly regarded and very little known trick...(even a lot of the \"Vette Masters\" I\'ve seen on these forums don\'t know this one hehe)

from the begining...go straight.....take the elevator going down....make a right off the elevator, take the first right, then a left into the hallway....here to the left you will see a door with a keypad on it....this is the room that has the elevator unlocking terminal

Now here\'s the trick: 90% of the time you can look into the room, but if you try to go into it, you will be pushed out and often killed.....so moving very carefully, position yourself in the doorway at an angle facing the terminal....be sure not to go too far in as it will throw you out and may result in death or incap...when you are at a good enough angle click the terminal and Voila....the elevator is unlocked....about 10 mins saved right there..

Barring that trick there are 2 other ways to go about it, the first is the \"real\" or \"correct\" way to do it

what you are supposed to do is:

find the defunct droid, retrieve a part from it, goto the SBD room on the right side of the ship, take the stairs down in this room...go into the next room, fix the droid, he will turn off the electricity, and then get the code to unlock the Elevator terminal room, I don\'t have directions for this, as I NEVER use this method :p


the other way is a variation of this, instead of getting the droid part, go directly to the SBD room, down the stairs, and into the next room, look at the 2 droids googly eyed as you run through the electricity, and try to hit the terminal to get the code before you are incapped or killed by the currents coursing through your burned, scorched flesh...good luck with this method.....if you are succesful on your first attempt at this though....it does shave about 5mins off your time


2.) Get the Prison Cell Code


the only code required for this mission is The Prison Cell Code, it is obtained by....
from the begining...go straight.....take the elevator going down....make a right off the elevator, take the first right, turn right, and take the tunnel going toward the front of the ship....this leads to a circular room with 5 halls leading off it... take the hall leading straight up....into the Hyper Drive room.....continue straight forward down the long hallway, at the juncture make a right....

continue on til you get to an elevator going down, take the elevator down, follow the hallway, make a left, go down the long passage and into the dark room there, then use the terminal in here to the right to get the code


3.) Talk to the Prisoners


First you need to unlock the Prison Cell using the code then go in and talk to each prisoner

The Prison Cell is located at: from the begining...go straight.....take the elevator going down....make a right off the elevator, take the first right, turn right, and take the tunnel going toward the front of the ship....this leads to a circular room with 5 halls leading off it... take the hall leading straight up....into the Hyper Drive room.....continue straight forward down the long hallway, at the juncture make a left....

this is the elevator you unlocked earlier, take it up.. off the elevator go left, continue on to the end of the hall, there is a door with a keypad here

use the keypad, input the Prison Cell Code you aquired at the beggining, inside the next room are the Prisoners, talk to each one here

MISSION COMPLETE


Exit the ship fast to get the badge and reward

4.) Use the Escape Pod


simply use the first escape pod you come across to exit the ship, they are the big yellow buttons found at the ends of the long dark corridors located along the edges of the ship

if you are unsure of where to find one......from the begining, make the first left, go straight into the dark corridor, make a left, hit the big yellow buttom


You have now beaten the Corellian Corvette

Return to whoever gave you the mission to get your reward


Also as a side note: I wrote all this from memory so if there are any descrepencies I am sorry

I hope you find this helpful


Heh.....you want me to give away ALL my secrets??? lol

OK as far as the looting of the Corvette......here goes:


LOOTING THE CORVETTE


There are 4 loot drops total on the Vette: 3 Armoires and a defunct droid(not the parts droid used to unlock the elevator)

To get to these drops follow these instuctions

Loot Drop 1:


From the Begining, make the first right, go straight, take a left and enter the elevator going up, go striaght off the elevator and make the SECOND right, this room is filled with SBD\'s and has an armoire on the far wall, Loot it


Loot Drop 2 & 3:


From the begining, go straight and take the elevator down, go right, then turn right, and follow the passage to the circular room with 5 halls leading off it, take the upper right most hall and at the end of it turn right, go into the little closet room there, it is also filled with SBD\'s and there is another armoire here, and the defunct droid, Loot them both

Loot Drop 4:


This is the hardest to get to as it requires a passcode, The Armory Code

To get it go, from the begining, make the first right, go straight, make a right and enter the \"computer room\" turn left and check the right most computer for the Armory Code

to get to the Armory, go, from the begining, go straight, take the elevator down, go right, turn right again, take that to the circular room with the 5 hallways, take the top most hallway leading toward the front of the ship, go straight, at the crossway keep going straight into a large room, on the far wall behind a wall of lockers or crates is a door that has a keypad on it, use the Armory Code here, enter the armory and turn right, on the far wall is another Armoire, loot it


Usually in these drops you\'ll get crap like a Crash & Burn spice, an FWG5 Pistol, a Rykk Blade, Bantha Doll or various other types of useless crap...........

but every once in a while, heh you get lucky, and that is the point of all this madness.......

the things you are looking for are:

First and foremost The AV-21 Power Plant (In my experience it spawns 1 in every 10 trips you take on the Vette)

The Beserker Stabalizer (this spawn is a little more frequent than the Power Plant, but not much)

and Finally, The Beserker Schematic (this seems to be the most frequent of the \"Good\" loot)


Good luck to you all and happy looting

More guides coming soon


This is the end of my Corvette walthrough series....I hope this helps you guys out, and I hope this is legible with the mass amounts of information listed